How to Get Search on Mac Working Again
Spotlight Search Non Working or Displaying Inaccurate Results, How to Set up?
Despite Spotlight's popularity, glitches can occur with this search engine. Results may become inaccurate, or Spotlight might non discover files, even though the information is present in the figurer storage. Also, a search query may exist entered, but no results are shown. Other than an inactive search field - there is no response to any query entered.

These issues were reported on diverse technical support forums with common cases like Spotlight exhibited problems after an operating organization update or upgrade. This is a result of a corrupted Spotlight alphabetize for storage (a department or all storage).
Fortunately, there are several methods available to re-index storage and other steps to troubleshoot Spotlight bug. In this article, we describe the near common methods to resolve these problems.
Video showing How to Fix Spotlight Non Working?
Table of Contents:
- Introduction
- Close SystemUIServer
- Use Disk Utility to check your startup deejay
- Change Desktop resolution
- Accommodate Spotlight preferences
- Check Spotlight re-indexing process
- Manually launch re-indexing procedure via Terminal
- Video showing How to Set up Spotlight Non Working?
Close SystemUIServer
Start by simply resetting a item procedure. This quick and piece of cake footstep often solves Spotlight-related issues.
i. First, launch Activity Monitor by opening Finder and going to the Applications folder.
2. Then, go to Utilities and choose Action Monitor.
3. In the window, expect for SystemUIServer in the list, or use a search field to notice it quickly.
4. Select this procedure and so click on the quit process button.
5. When you close this process, the carte bar and dock will reload inside a few moments - this is a sign that the process has been reset. Check if Spotlight issues are fixed.

[Back to Table of Contents]
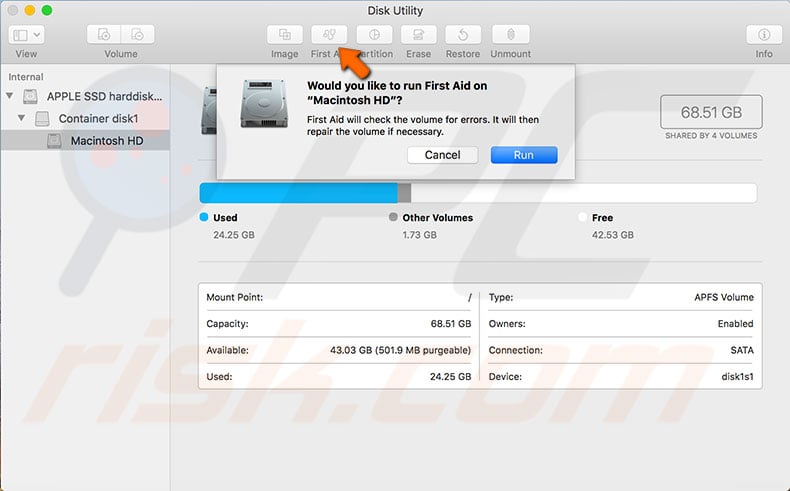
Use Deejay Utility to check your startup disk
Disk Utility contains startup disk diagnostic tools, which are helpful when encountering various problems. This tool is often enough to solve these issues. Enter recovery fashion by restarting the Mac.
1. Shut downwardly your Mac.
2. At present, plough information technology back on. Immediately when yous hear the startup chime, agree downward Control and R until the macOS Utilities appears.
3. Select Deejay Utility from the prompted menu, choose the startup disk and click the Get-go Aid icon at the top of the screen.
4. Click Run to launch the repair tool, which checks and repairs the disk. If Kickoff Aid reports that not all errors were fixed, relaunch it and repeat these steps several times.
5. Finally, reboot the Mac and check if Spotlight Search works.
[Back to Table of Contents]
Modify Desktop resolution
This may seem similar an odd solution, but many people study that it is useful when encountering the trouble when a search form does not appear with a highlighted Spotlight bill of fare icon.
1. Get to Mac's System Preferences, open Display, and select a resolution smaller than the current value. Note that 640 ten 480 should always work.
2. In one case the resolution is changed, return to the native resolution and so that your screen display is dorsum to its original state. Then, test the Spotlight feature - this often solves the problem.

[Back to Tabular array of Contents]
Adjust Spotlight preferences
If you lot cannot find the required results, ensure that Spotlight preferences are correct.
1. Open Mac's System Preferences and select Spotlight.
2. Check the Search Results tab to ensure all the necessary results are enabled via the checkbox abreast each title.
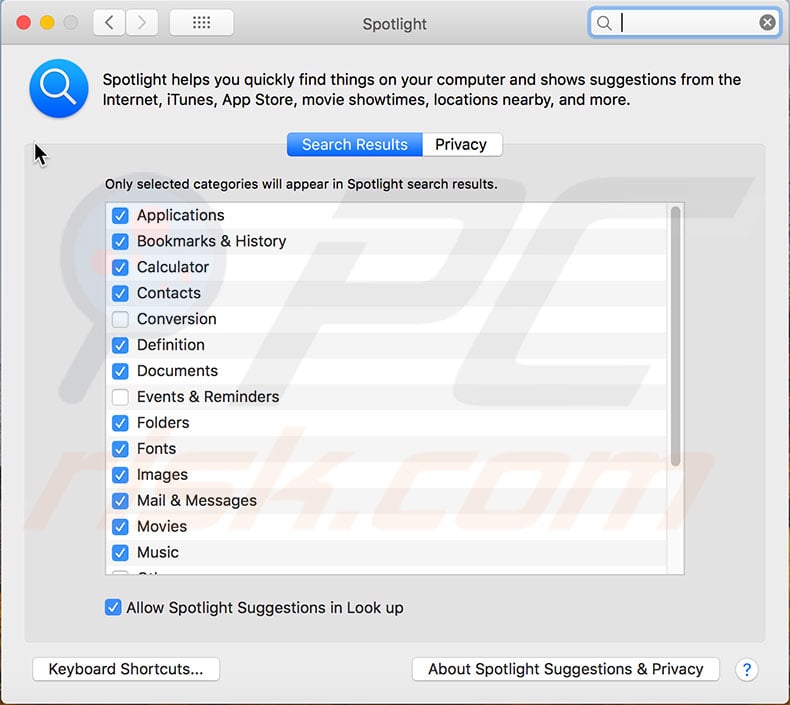
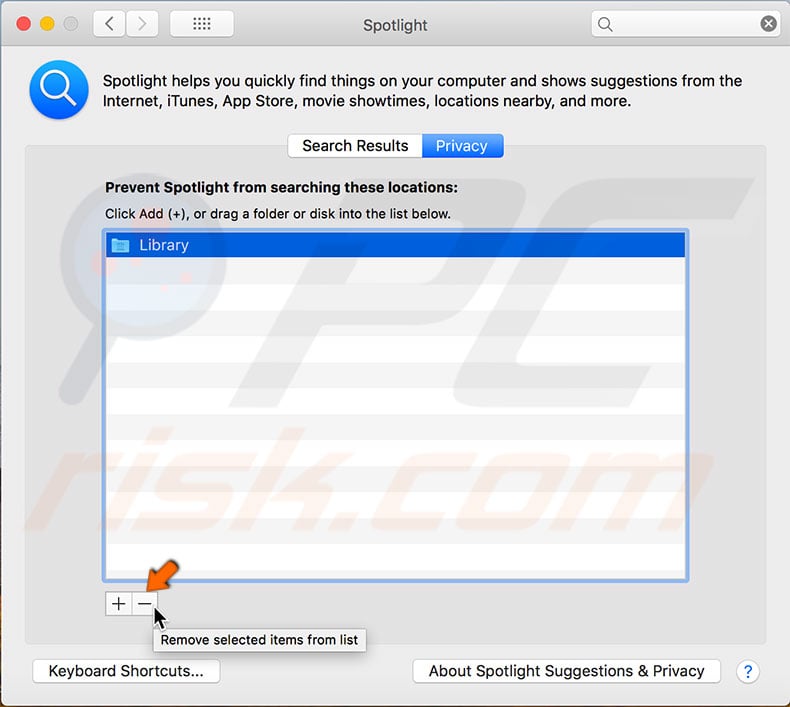
3. Next, ensure Spotlight is not excluding required folders or applications by opening the Privacy tab.
4. If everything seems correct, click the Add (+) icon under the list and select the startup deejay or any folders for which results are not showing in the Spotlight search. Alternatively, just drag folders y'all wish to re-alphabetize into the listing and agree with the alert letters.
five. Once you have selected all folders or the entire deejay, click to select them and click the Remove (-) button at the bottom of the listing.
6. Finally, quit Organisation Preferences, and Spotlight will begin the re-indexing procedure for the listed folders or drives.
[Back to Table of Contents]
Check Spotlight re-indexing process
The re-indexing procedure does not brandish a progress bar or messages. However, you can check if Spotlight is still running the process via Action Monitor.
1. First, launch Activeness Monitor by opening Finder and going to the Applications folder.
ii. Then open Utilities and run the app.
iii. When the new window prompts, use the search field and type in 'mdworker'. Activity Monitor volition brandish all Spotlight-related re-indexing processes. This list will confirm that the re-indexing process is running.
4. When at that place are no longer any active processes in the Action Monitor, try to employ Spotlight again. Deport in mind that this process may take some fourth dimension. The duration required depends on the number of files stored in the selected folders or disks.

[Back to Table of Contents]
Manually launch re-indexing process via Terminal
If Action Monitor finds whatever active 'mdworker' processes later adjusting Spotlight preferences, you can manually launch the re-indexing procedure using Terminal.
i. Launch Mac'south command line by opening Finder and going to the Applications binder.
2. Then open up Utilities and Run Terminal.
3. When the command line window prompts, type the following control and hit return: sudo mdutil -E
iv. Confirm your action past entering the administrator business relationship countersign.
5. The command volition beginning the re-indexing process for all Mac drives, including plugged external drives. If y'all wish to re-index a specific drive only, use the following command: sudo mdutil -E /Volumes/(name of specific drive)
As mentioned before, the re-indexing process may take some fourth dimension, depending on the amount of data stored on the drive. Therefore, you lot must expect until Concluding becomes active once again. One time the procedure is consummate, open up Spotlight to check if the problem is resolved.

Detailed usage guide of Spotlight y'all may notice in this article.
[Back to Top]
Virtually the author:

Writer of how-to guides for Mac users. Responsible for collecting, analyzing, and presenting trouble-solving solution articles related to macOS problems. Years of macOS feel combined with solid research and analyzing skills help Karolina provide readers with working and helpful solutions equally well as introduce various features Mac has to offering. Contact Karolina Peistariene.
Our guides are free. However, if you want to back up us you lot can send u.s. a donation.
Source: https://blog.pcrisk.com/mac/12708-spotlight-search-not-working-on-mac-how-to-fix
0 Response to "How to Get Search on Mac Working Again"
Enregistrer un commentaire